Wednesday, October 27, 2010

Tuna Wraps and Tomato Soup


MMMMmmm! We enjoyed a very healthy, balanced meal at The Chambs' tonight.

Tuna Wraps Ingredients:

Whole wheat tortillas
Tomatoes
Solid Tuna
Sliced black olives
Onion
Mayonnaise

Instructions:

  1. Drain the tuna and mix with one tbsp of mayo.
  2. Cut up the onions very small and add it to the tuna mix. 
  3. Place a lettuce leaf in the center of each wrap.
  4. Divide the tuna mixture evenly (in the center of the wrap - in a long strip)
  5. Add black olives
  6. Add the tomatoes
  7. Fold in the wrap at the ends, roll up, and cut in half diagonally. 
  8. Enjoy!!!
Next time I make this wrap, I'll add some pieces of hard-boiled eggs. MMmmmm!!!

Tomato Soup

I used a recipe found at the Reluctant Gourmet


Have a nice evening!

~The Wife 

Giveaway Announcement

Just wanted to share with you that my friend Jill is doing a giveaway of a Beth Moore book and a set of notecards from Macedonia. She also has a great list of recipes at her blog. I keep on drooling over SEVERAL of them!!! 

You can find her blog here  . The entry about the giveaway is here

Stay tuned for more recipes! 

~ The Wife


Sunday, October 24, 2010

Pumpkin Ravioli with Alfredo Sauce


This week, Hubby and I, decided to do things differently. Instead of him making the dish for me, we decided to make it together and take advantage of some good bonding time together in the kitchen. We talked, played around, argued, talked, and kissed, and talked some more ...all while making the ravioli. This is what makes cooking fun, building memories together while enjoying some really good food.


Ingredients:

1 1/4 cup of puree pumpkin
2 tbsp Bread Crumbs
30 Wonton wrappers
1/2 tsp minced Sage
1/8 Nutmeg
2 tbsp Parmesan Cheese
1 jar Alfredo Sauce
Water

{ This recipe has been adapted from MyRecipes.com }


Steps

1. Have a cookie sheet covered with aluminum foil and spread the pumpkin.


2. Cover it with another sheet of aluminum foil and let it stand for 5 minutes.


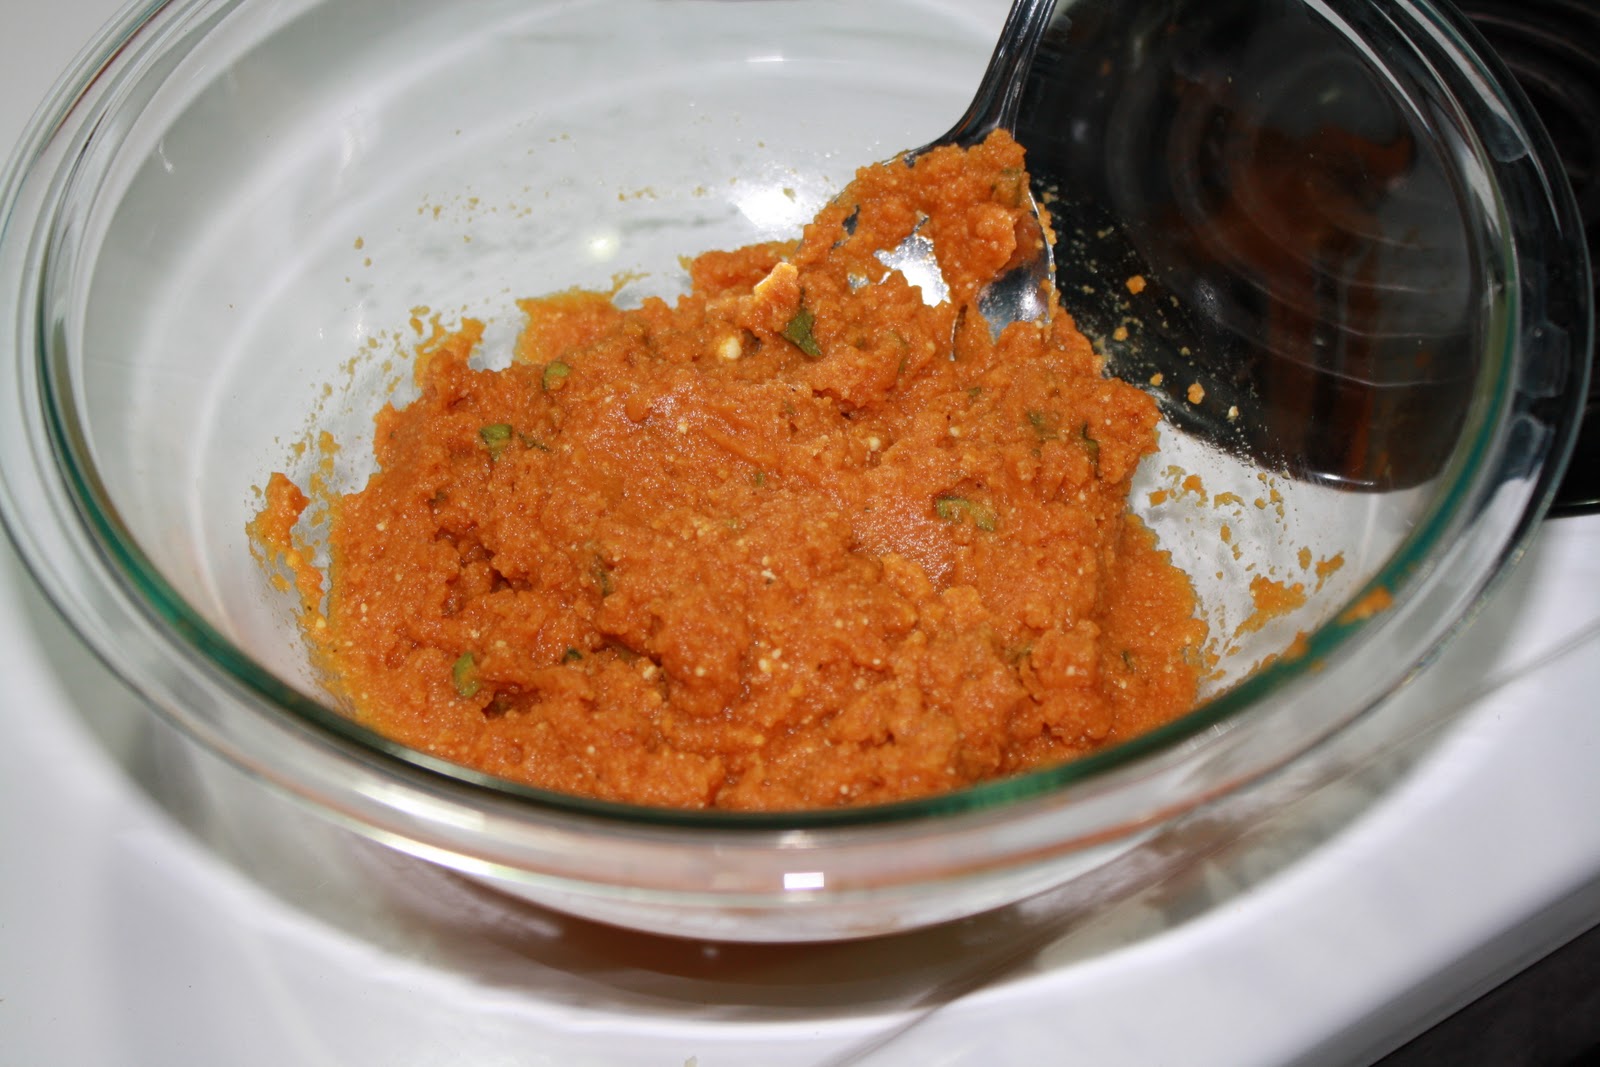
3. Use a plastic spatula to scrape the pumpkin into a bowl.

4. Once the pumpkin is in the bowl, stir in the sage.


Then the breadcrumbs,


Then the nutmeg,,


The Parmesan cheese, salt, and pepper.


5. Mix well. This will be the pumpkin mixture to go in the wonton wrappers to make the raviolis.


6. Stuff the wonton wrappers, seal them with water, fold all the edges.


Spoon 1 tsp of the pumpkin mixture into the center of the wrapper.


Have a brush and a bowl with cold water by you.


Brush the edges...


Fold the wrapper.

This is the method that worked for us.


We made a Gorgonzola Sauce to go with this dish....yet it was too strong, so we used Alfredo Sauce instead.

Gorgonzola Sauce in the making.
It did not taste as good as the name sounds. 
7. Heat up water in a pot, but DO NOT boil the water. Add the ravioli with some oil to prevent them from sticking together.
Cook until the dough is tender. (Most sites said it'd take 4 minutes, but for us it took 10 -12 minutes). 


and then, the most awaited moment of the evening,

8. Time to Eat!!!!!!!!!!!


What a delight! Our Daughter tried it and liked it :-). I think she mostly liked the Alfredo sauce. Impossible to not like it :)

More Pumpkin recipes coming this week!

~Happy Fall

Friday, October 22, 2010

Thanksgiving Planning Made Easy with a Printable Table!

We are about one month away from one of the best times of the year, Thanksgiving!!!! I love all the food (of course!!!), the family gatherings, and all the picture taking, ha!  So I got to thinking and planning for the occasion, and created a chart of ideas to help me plan the meals for it. I created a pdf file called Thanksgiving Menu Ideas - and I am sharing it with each one of you through Google Docs! Just click here to find it. 

This handy table is helping me decide what I want to make for the Main Dish, Side Dishes, Salads, Desserts, and Drinks. 


Do you have a traditional Thanksgiving recipe that you'd like to share with us? Send me an e-mail with the recipe and picture and I'd love to share it in the blog.  thechambs@gmail.com 

Thursday, October 21, 2010

Seafood Wednesday: Baked Cod with Tomatoes and Onions

Exactly a week ago (as of yesterday when I made this dish), all 33 miners and the rescuers made it to the surface safe and sound. Last week I skipped Seafood Wednesday because we had a small 'asado' or grilled meat to celebrate the success of the operation. I even got to sing the national anthem with my family and millions of Chileans who were watching the rescue from their homes, at the Mina San Jose, and other places around the world. It has been an event that has touched my heart.

So yesterday's dish was first of all dedicated to my family and to Chile and to anyone who loves fish. 


Want to give it a shot? 


1. Place cod in a bowl and season it with salt (i used sea salt) and black pepper. 

2. Make some fresh lemon juice and add it to the fish. Let it stand while you continue making the other parts of the dish. 


3. Melt some butter in a pan and add onions. 


4. Add paprika or 'aji color' (it's a type of chile powder) to the onions.  Cook until the onions are tender/soft. 

5. Add peeled and diced tomatoes to the mixture. Mix well for a couple of minutes. Just enough so the tomatoes are cooked. 

(It is Chilean tradition to peel the tomatoes. I've always been challenged in this aspect even though I am Chilean, ha! This time, however, I peeled the tomatoes in no time!) 
6. Then use a clay baking bowl if you have one or a regular glass bakeware. Have the potatoes cut up and diced and make a layer of them. 

Clay Bakeware - bought at Los Dominicos
Santiago, Chile

7. Then make a layer of the tomatoes with onions mixture.


8. Top it with the fish and bake at 350 for about 15-20 min. Just long enough so the fish is cooked. If you leave it too long, the fish and the mixture will dry. 


9. Serve with rice and garnish with lemons (and parsley if available)

10. This is my favorite salad: Lettuce with tomatoes and tuna. PERFECT salad to go with this dish!!!! 


11. Enjoy! 


~ Have a great day! 

Tuesday, October 19, 2010

Best Lemon Cake Recipe


This pregnancy has had me craving foods I have absolutely never liked and never even imagined liking. I have never (before) liked lemons nor spicy foods. While pregnant,


  • I have called my Dad to ask him to please bring me a 2liter lemonade because I couldn't drink anything else ---since it didn't taste like lemons!
  • I've asked my Hubby to freeze water with lemons,
  • We've bought more lemons for salads and meals than I could count! 
  • I have ordered buffalo chicken wings several times and not find it very spicy,
  • And I have also used dijon mustard generously in my sandwiches.  
My Hubby is hoping I will, at least, like lemons after Baby # 2 is born. We shall see what happens in a about two months. (Can you guess what we're having because of these cravings!!!???)

SOOO when I found this AMAZING Lemon Cake recipe over at Make-a-Cake Series, I immediately showed it to my Hubby so he could make it for me. Yay, how lucky am I? :-)  


Want to see how he  made it?

1. We got a lemon cake mix at the store and added lemon zest to it.


2. Mix it real well. 
3. Bake the cake according to the directions on the box. 
4. Once it COOLS, add the lemon curd - we used Martha Steward's recipe for it.  
Let me tell you, this was my FAVORITE part of the cake! The curd had such a powerful and strong lemon flavor that really made me wish the cake had more layers of curd. That's how good it was! 


5. Then we put it in the fridge so he could candy the lemons and make some lemon syrup as well.  For this step, you basically slice the lemons, put them in the pot with lots of sugar and water.


6. Set the lemons on parchment paper or plastic wrap until they cool down. 


7. Once everything has cool down, make the frosting for the cake. My hubby used cool whip cream for the frosting.

8. Top it with the lemon candy.

9. Enjoy!


Monday, October 18, 2010

Pumpkin Challenge: White Bean and Turkey Stew in Pumpkin Bowls

Stew in Pumpkin Bowls garnished with Bay Leaves

 This is the first pumpkin dish that I made for my family this past weekend! It consisted of white bean and turkey stew in pumpkin bowls. Whoa! This dish was truly an adventure to make because...:

  1. It was my first time buying pumpkins at the store. 
  2. It was my first time cutting out the tops and removing the seeds.
  3. It was my first time eating a pumpkin dish that was not pumpkin pie. 
I found this recipe at the Martha Steward website and I changed it a bit to make it my own. I substituted the sausage for turkey (I love the taste, smell, and texture of turkey - plus it's healthier!) and I didn't include the leeks nor the mushrooms. Ever since pregnancy # 1, I tend to keep mushrooms out of my meals. Used to be my favorite, though. Things change. 

This recipe calls for baking the pumpkins THREE times. You read that right, exactly three times and for different purposes. 
1st time - to bake the tops and right side of the pumpkins
2nd time - to bake the bottom of the pumpkin
3rd time - to bake the pumpkin WITH the stew. 

This is where the stew gets a really 'pumpkinny' flavor. The pumpkin is so soft and tender by now that its flavor permeates the stew. It is very tasty. And it makes for a very comforting, 'fallzy' flavor.  

In addition, when running out of the pumpkins, the stew mixes real well with rice and pasta. 


Pumpkin bowl covered - keeps the stew very hot! 

Filled Pumpkin


Stew in Pumpkin Bowls garnished with Bay Leaves

Come back next week for another Pumpkin dish!

~ Happy Pumpkin Cooking ~


Friday, October 8, 2010

Pumpkin Cooking Challenge

Fall has really become one of my favorite times of the year. I love the colors, the decorations, the pumpkins, and the endless possibilities that the Fall Season entails.  I am in love with Fall.

So, I am going to start a Pumpkin Cooking Challenge - one pumpkin dish a week for the next month.
  
Seafood Wednesday will remain and I already know what I will be making next week! 

~ The Wife 

Saturday, October 2, 2010

Food and my Toddler: Banana Joy

I spent months and months waiting for this day! The day that my daughter would actually EAT a banana instead of fuzz with it. I tried different things that relatives and friends would recommend such as:  adding a bit of orange juice to it with sugar, banana with honey, mashed bananas, sliced banana to eat with a fork or as a fingerfood, removing the seeds of the banana. Nothing worked. There were times she would keep her hands to herself and not touch a single piece, other times she would pick up a piece and complained because it was too sticky on her fingers. Other times she didn't like to use the fork because the banana would fall off... the list could go on and on.

So one day (more like a month and a half ago) she saw me eating a banana from the peel. Of course she likes to try/eat everything that Mommy has so she asked for a bite of the banana. I was a bit hesitant about it, because I was so sure she was going to spit it out.  To my surprise, she didn't. She smiled and asked for more.

As I am writing this entry, she is eating a banana. It makes me so happy that she likes it :-)


Friday, October 1, 2010

He Cooks, I Eat: Perfect Strawberry and Chocolate Mousse Chocolate Cake


The following is a chocolate cake that my Hubby made for me since I love chocolate quite a lot! 

Steps: 

1.     He used a chocolate cake mix and baked it according to the instructions. 
2.     Then he cut it into layers (I loved this part) and added chocolate mousse. 
3.   Prepare the ganache - my Hubby knows how to make this by heart now since it also works GREAT on brownies or top cupcakes instead of using icing.
Here is a good recipe for it from the Food Network
http://www.foodnetwork.com/recipes/saras-secrets/master-ganache-recipe/index.html
Basically do a double-boiler for the Ganache. Add the chocolate to the second bowl and add heavy whipping cream as you go.
It makes the chocolate so perfectly creamy! 
4.     Clean, cut/slice strawberries to decorate the cake. 
5.     Do a white chocolate ganache to drizzle the cake. 
6.     Enjoy!